Tutorial: How to Write Pickup Measures
In this 3-minute video, we’ll show you how to write pickup measures in your score (and everything else you need to know about pickups)!

Here’s a (slightly edited) transcript of the video for you
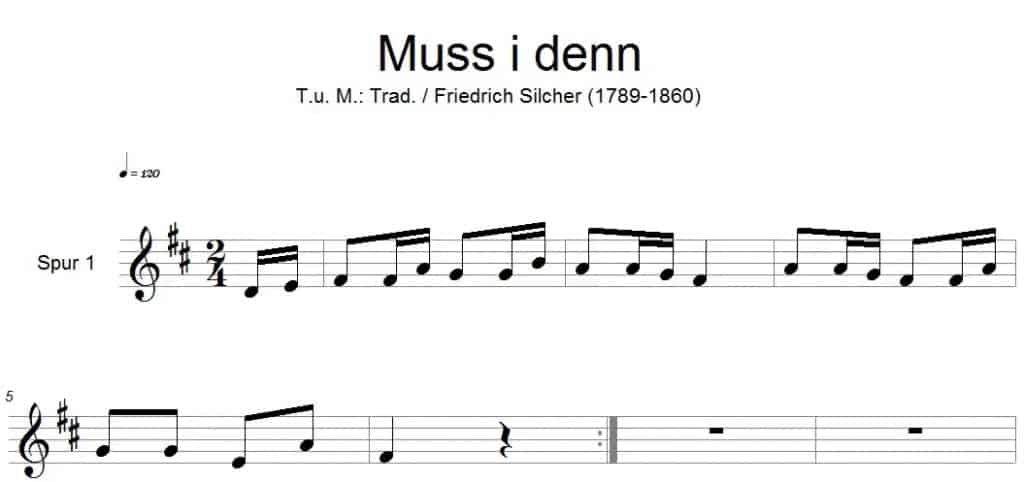
You can add a pickup to the beginning of the score using the Score Wizard when setting up your score. Generally, the last measure has to be shortened by the note value of the pickup measure.
In our example, you can see that FORTE has already optimized the first and last measures. You’ll also see there’s a repeat in the middle of our song. This means the measure containing the repeat must be shortened.
This song has a two-quarters signature and the pickup has two 16th notes, equivalent to the value of a one-eighth note.
In measure 6, you can see there is a quarter rest instead of the required eighth rest. So, in the following measure, we will have a new pickup of one-eighth note.
All other measures return to the original two-quarters time signature.
Now let’s look at the input palette. In the “Meter” tab, you’ll find all the options you’ll need.
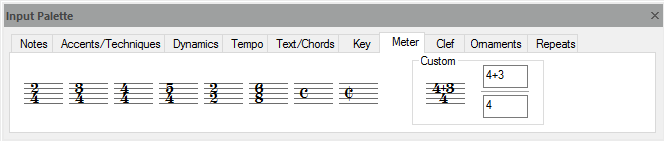
First, we’ll enter a two-quarters meter in measure 8. (Doing this will mean we won’t mess up the following measures. This can be critical if you’ve already written notes into the later measures.)

Select the two-quarters meter from the input palette and add it to the score with a click.
Now, add the correct meter for measure 6, the last measure before the repeat sign. We’ll need a 3-eighth note meter. So, enter the values “3” and “8” into the respective custom field of the “Meter” tab and add the custom meter to measure 6.
(Please note that custom meters are only available in FORTE Home and FORTE Premium.)
Now we need a one-eighth note meter for measure 7. That is the mock pickup measure of the second part of our song.
And now we can enter the notes for the rest of our song.
Use the properties window to edit and hide elements
Next we’ll hide the time signatures.
Double-click on the element and open the properties window with a right-click. Select the tab “General” and check the box “Hidden.” Repeat this procedure for all other time signatures.
For our final step, we’ll tidy up the layout and edit the spaces for the notes and sizes of the measures.
To reposition an element, simply click on the element. (Now that it’s marked, it should turn red.) Press “control” and keep “ctrl” pressed while using the arrow keys to reposition the element to the desired place.
We hope you found this tutorial helpful and we look forward to reading your comments.
For more tutorial videos, check out our YouTube channel.
Have a great day!
Your FORTE Team

")


How do I start the bar numbering after the pick up – ie on the first full bar?
Hi John,
that’s an excellent question.
Please go to Score – Layout – Tab “Options”
You can edit the measure numbering here.
(This is available in FORTE Home and Premium).
Kind regards,
Your FORTE Team
Very helpful about pickup measures.
Something I often need to do in my band music is insert a double vertical line somewhere in a measure to indicate separate sections of the score. I can only find a way to add the double lines over measure bar lines. Is there a way to do what I want with double lines within a measure?
Dear Gail,
thank you for your question.
In order to indicate separate sections, we recommend you use the marker tool that you find in the input palette’s tab “text / chords”.
Of course, double vertical lines also indicate a new section.
However, double vertical lines can only be added at the end of a measure.
If neither the marker or the comma (“Accents / Techniques” ) will suffice,
you’ll have to adjust the meter (and hide the element afterwards)
in order to insert double vertical lines “into” the measure.
Kind regards,
Your FORTE Team